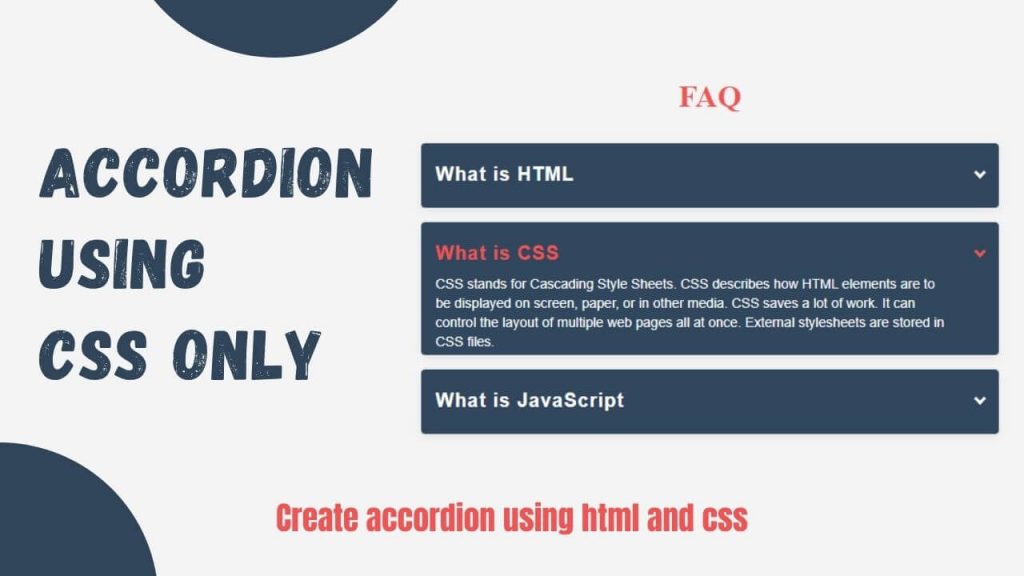
Are you looking to create an engaging accordion on your website without relying on JavaScript? Look no further! In this tutorial, we will guide you through the process of creating a dynamic accordion using CSS alone. By leveraging CSS tricks, you can provide an enhanced user experience that will impress your visitors.
Step-by-Step Tutorial: Creating the CSS Accordion
Accordions are a popular UI element that allows you to present collapsible content in a structured and user-friendly manner. By utilizing CSS techniques, we can achieve an accordion effect without the need for any JavaScript. Follow the CSS Tricks Accordion.
Creating an Accordion Using CSS
Step 1: Set up the HTML structure
To begin, create a brand new HTML report and upload the following code:
<body>
    <div id="faq">
        <h1>FAQ</h1>
        <ul>
            <li>
                <input type="checkbox" checked>
                <i></i>
                <h2>What is HTML</h2>
                <p>HTML stands for Hyper Text Markup Language. HTML is the standard markup language for creating Web pages. HTML describes the structure of a Web page. HTML consists of a series of elements. HTML elements tell the browser how to display the content.</p>
            </li>
            <li>
                <input type="checkbox" checked>
                <i></i>
                <h2>What is CSS</h2>
                <p>CSS stands for Cascading Style Sheets. CSS describes how HTML elements are to be displayed on screen, paper, or in other media. CSS saves a lot of work. It can control the layout of multiple web pages all at once. External stylesheets are stored in CSS files.</p>
            </li>
            <li>
                <input type="checkbox" checked>
                <i></i>
                <h2>What is JavaScript</h2>
                <p>JavaScript is the Programming Language for the Web. JavaScript can update and change both HTML and CSS. JavaScript can calculate, manipulate and validate data.</p>
            </li>
        </ul>
    </div>
</body>
Step 2: Create the CSS file Next
Create a new CSS file and link it to your HTML file by adding the following code within the <head> section:
<link rel="stylesheet" href="styles.css">
Step 3: Add CSS styles In the CSS file
Add the following styles to achieve the accordion effect:
body {
	display: flex;
	background: #f4f4f4;
}
#faq {
	max-width: 600px;
	margin: auto;
	padding: 0 15px;
	text-align: center;
}
#faq ul {
	text-align: left;
}
#faq h1 {
	color: #f05454;
	margin-bottom: 30px;
}
#faq h2 {
	color: #f05454;
	font-family: 'hm_light', sans-serif;
	font-size: 20px;
	text-align: left;
	line-height: 34px;
	padding: 15px 15px 0;
	text-transform: none;
	letter-spacing: 1px;
	font-weight: 600;
	display: block;
	margin:0;
	cursor: pointer;
	transition: .2s;
}
#faq p {
	color: #fff;
	text-align: left;
	font-family: 'hm_light', sans-serif;
	font-size: 14px;
	line-height: 1.45;
	position: relative;
	overflow: hidden;
	max-height: 250px;
	will-change: max-height;
	contain:layout;
	display: inline-block;
	opacity: 1;
	transform: translate(0,0);
	margin: 5px 50px 0 15px;
	transition: .3s opacity, .6s max-height;
	hyphens: auto;
	-webkit-hyphens:auto;
	-ms-hyphens:auto;
	z-index: 2;
}
#faq ul {
	list-style: none;
	perspective: 900;
	padding: 0;
	margin:0;
}
#faq ul li {
	position: relative;
	overflow: hidden;
	padding: 0;
	margin: 0;
	background: #30475e;
	box-shadow: 0 3px 10px -2px rgba(0,0,0,0.1);
	-webkit-tap-highlight-color: transparent;
	border-radius: 4px;
}
#faq ul li + li {
	margin-top: 15px;
}
#faq ul li:last-of-type {
	padding-bottom: 0;
}
#faq ul li i {
	position: absolute;
	transform: translate(-6px, 0);
	margin-top: 28px;
	right: 15px;
}
#faq ul li i:before,
#faq ul li i:after {
	content: "";
	position: absolute;
	background-color: #f05454;
	width: 3px;
	height: 9px;
}
#faq ul li i:before {
	transform: translate(2px, 0) rotate(45deg);
}
#faq ul li i:after {
	transform: translate(-2px, 0) rotate(-45deg);
}
#faq ul li input[type=checkbox] {
	position: absolute;
	cursor: pointer;
	width: 100%;
	height: 100%;
	z-index: 1;
	opacity: 0;
	touch-action: manipulation;
}
#faq ul li input[type=checkbox]:checked ~ h2 {
	color: #fff;
}
#faq ul li input[type=checkbox]:checked ~ p {
	margin: 0;
	max-height: 0;
	transition: .3s;
	opacity: 0;
}
#faq ul li input[type=checkbox]:checked ~ i:before {
	transform: translate(2px, 0) rotate(45deg);
	background: #fff;
}
#faq ul li input[type=checkbox]:checked ~ i:after {
	transform: translate(-2px, 0) rotate(-45deg);
	background: #fff;
}
.transition, p, ul li i:before, ul li i:after {
	transition: all 0.3s;
}
Step 4: Test the accordion Save your CSS file as styles.css and open the HTML file in a web browser.
You should now see the accordion with collapsible sections. Clicking on each section’s header will expand or collapse the associated content.
Final Thoughts
Congratulations! You have successfully created an accordion using only HTML and CSS. By avoiding the use of JavaScript, you have achieved a lightweight and efficient solution. Feel free to customize the styles and add more accordion sections as needed. Accordions can greatly enhance the user experience on your website by organizing and presenting information in a visually appealing manner.

 Get Twitter API in 2023 In today’s digital age, social media… Read more: How to Fetch Twitter Details | How to embed twitter to website using API | Twitter API v1.1
 10 Mind-Blowing Tricks to Elevate Your Web Design Skills As a… Read more: Boost Your Web Design Skills: 10 CSS Tricks That Will Blow Your Mind!
 Adding animations to a web page is a fantastic way to… Read more: Creating Engaging Web Animations with HTML and CSS: A Simple Snake Animation Example
 Are you looking to center a div on your webpage and… Read more: Center a div like a Pro: 4 Essential Techniques You Must Master in CSS
 Neumorphic design has taken the web design world by storm with… Read more: Neumorphic Design: Revolutionize Your Login Experience with Cutting-Edge Techniques